

Content Studio lets you write a post once, choose which connected platforms to publish to, add photos or video, and publish now or schedule for later — Google Business, Facebook, Instagram, LinkedIn, TikTok, YouTube, and Pinterest.
It's organized into three tabs — Calendar, New Post, and Planner — so you can see what's scheduled, write something new, or let AI plan a batch, all in one place.
Before you start
Connect your accounts first on Content → Connections. Each platform shows a Connect button (or Connected with a Disconnect option). Only connected platforms appear in the composer.
You need at least one connected platform to write or plan posts. Until you connect one, you'll see a Go to Connections prompt above the calendar — your existing posts still appear there, but the New Post and Planner tabs stay hidden until a platform is connected.
Finding your way around
Content Studio has three tabs across the top:
- Calendar — your home base. See everything you've scheduled and published in a month, week, or list view, and open any post to manage it.
- New Post — write and publish (or schedule) a single post.
- Planner — let AI draft a batch of posts for you to review and approve.
The blue + New Post button (top-right) jumps straight to the New Post tab with a fresh, empty post. Clicking a day on the calendar does the same, with that date already filled in.
Write a new post
Open the New Post tab (or click + New Post), and use the location switcher to choose the location you're posting for.
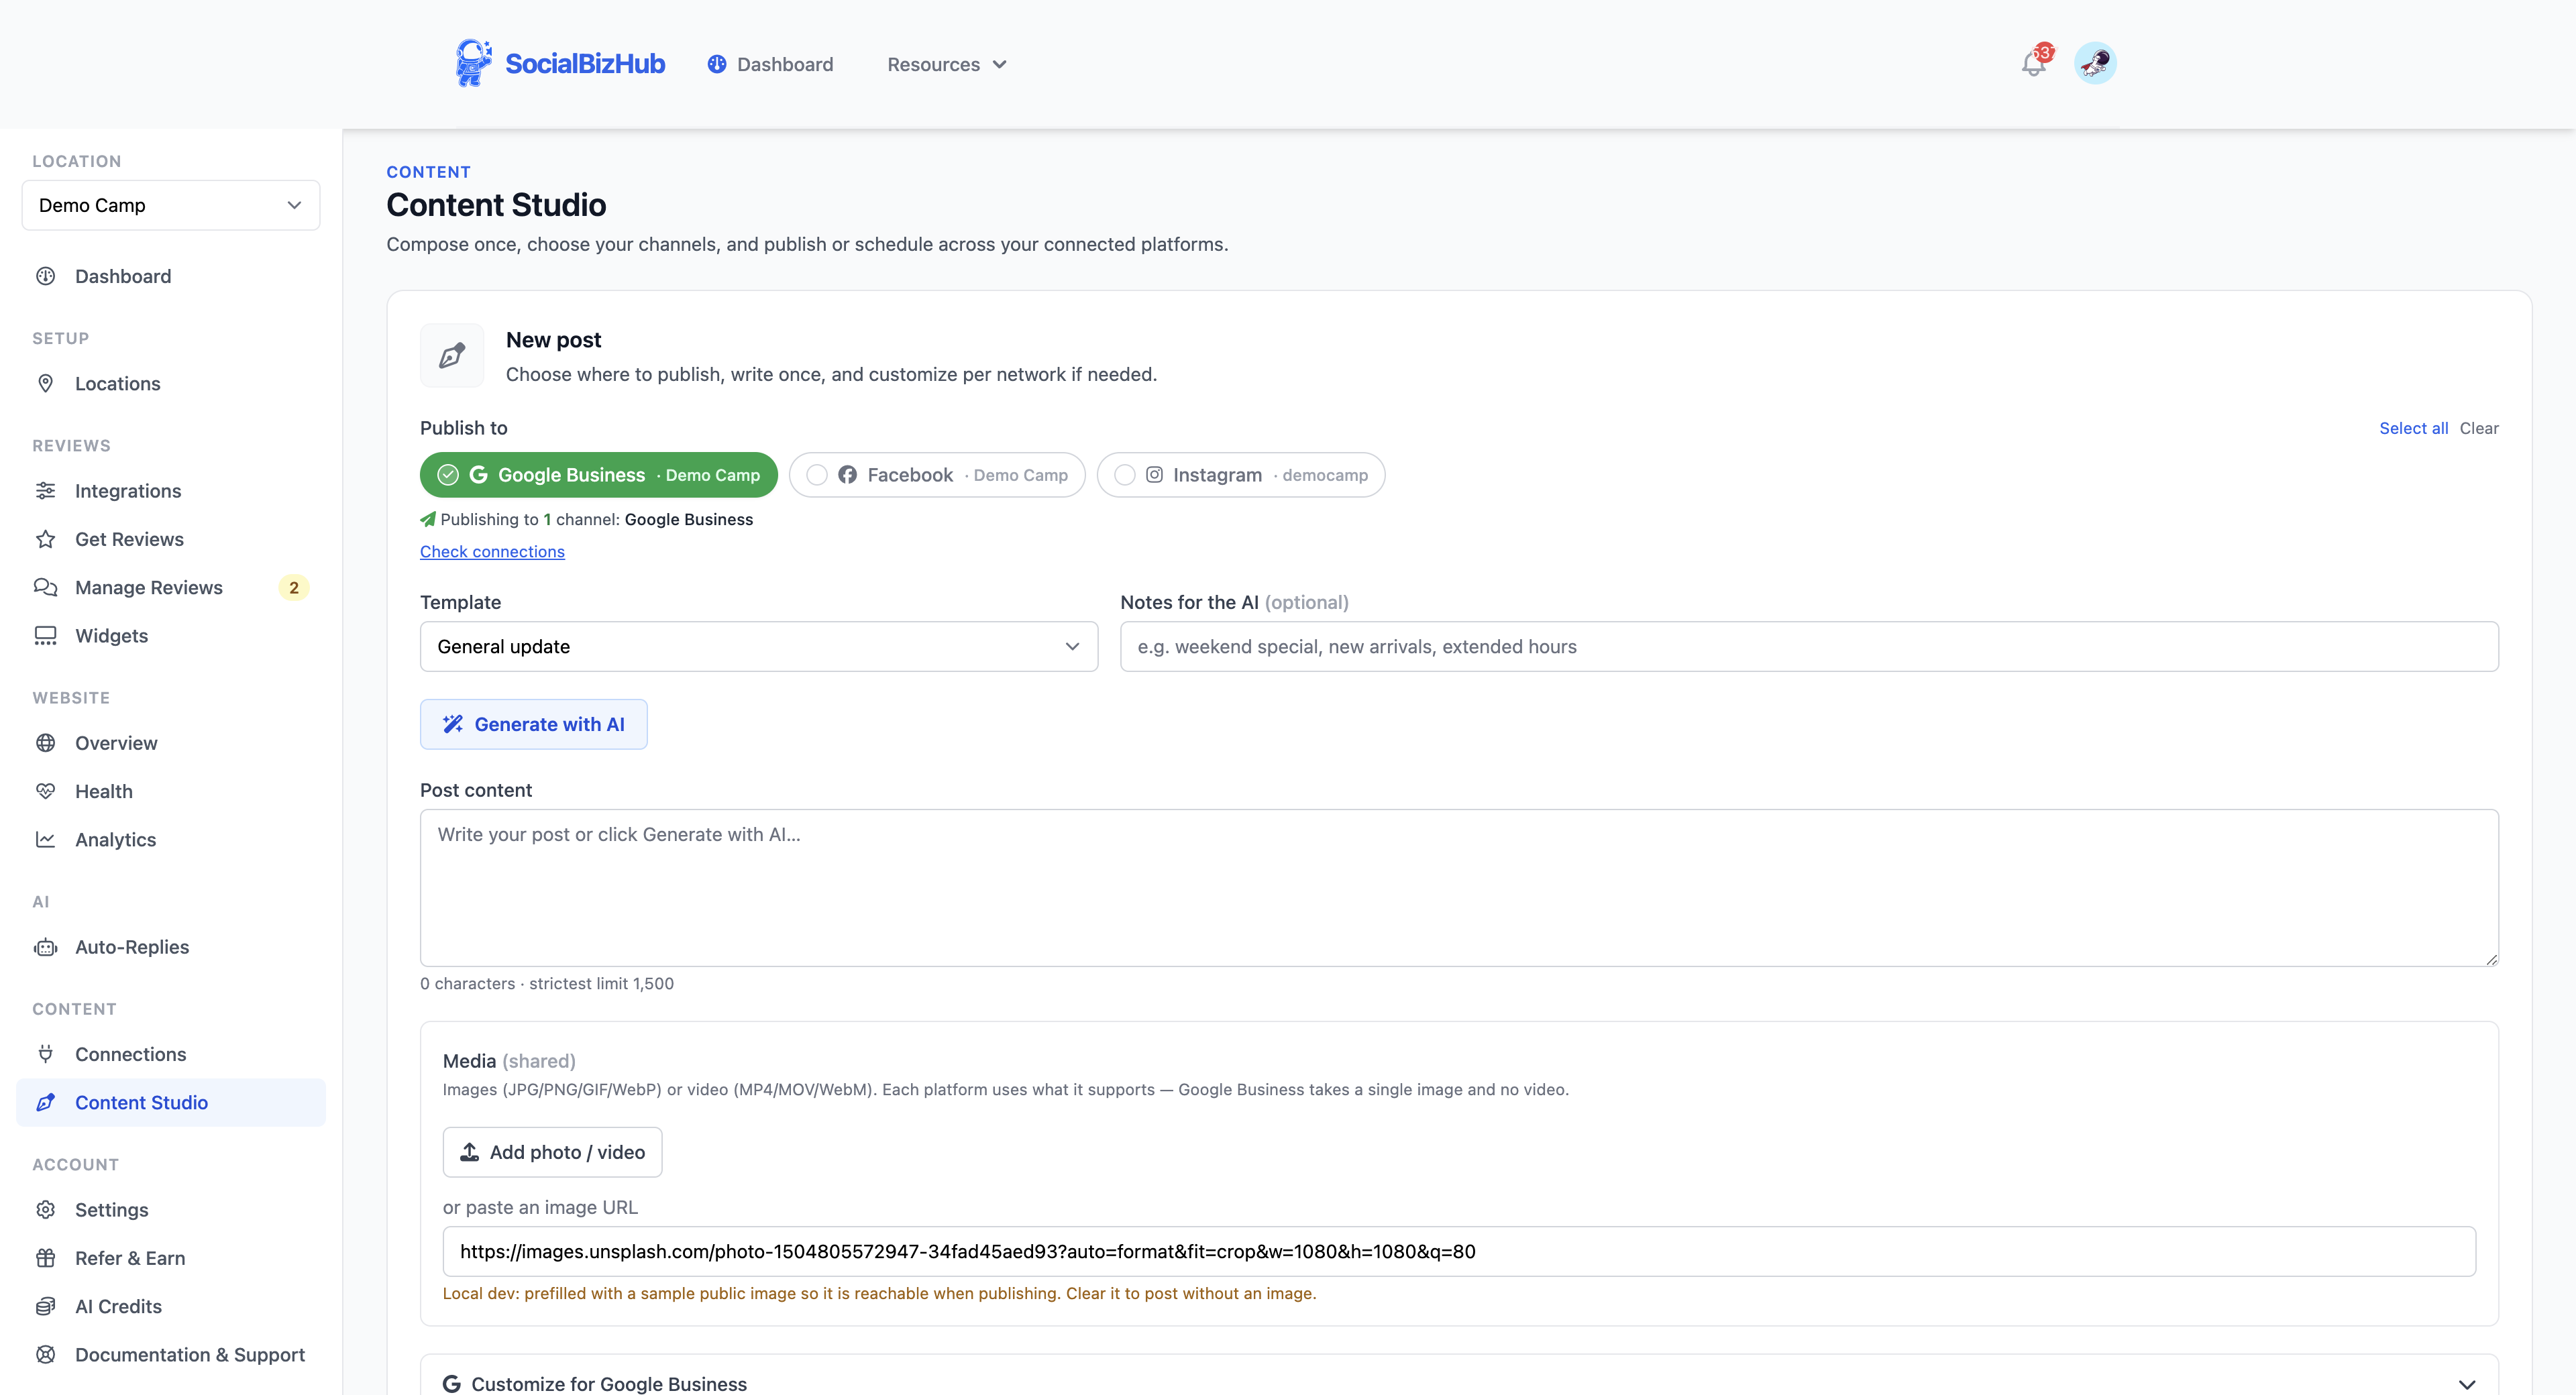
Step 1 — Choose your channels
At the top of the composer, your connected platforms appear as channel chips. Tap each platform you want to publish to — selected chips turn solid blue with a check, and a line shows exactly where the post will go (for example, "Publishing to 2 channels: Google Business, Instagram"). Use Select all or Clear for convenience. Check connections verifies each selected account is healthy and ready to post.
Step 2 — Tell the AI what this post is about (optional)
- Under What's this about?, tap a chip if the post has a purpose — an Offer, an Event, Availability, News, a Milestone, a Shout-out, or Other. No chip needed for a general update.
- Add the one detail that matters — for example "2-for-1 Tuesdays, ends Oct 31" or "Live music Sat Aug 9, 7pm". Whatever you type here is featured exactly as written: the AI never changes your dates, prices, or terms, and never invents extras on top of them.
- If you've added things to your What's happening board (see below), a Pull from your board row appears — one tap drops an entry straight into the chip and detail for you.
- Need to say more? Add extra notes works like it always did.
Step 3 — Generate your caption
Click Generate with AI. The copy is tailored to your location's type, so a campground reads differently from a salon — and it draws on your business profile, the things customers praise most in your reviews, and the style of your own past posts, so it sounds like you, not a template. It's also written for the channel you selected: an Instagram caption gets a visual hook and hashtags, a Google Business post reads like a local update, LinkedIn stays professional. If you've selected several channels, the caption is written to work well across all of them.
Edit the draft however you like. If you click Generate with AI again after editing, we'll ask before replacing your edited text — your words are never overwritten silently. The character counter shows the strictest limit among your selected channels.
Step 4 — Add photos or video
Use Add photo / video to upload media. You can add several images (a carousel) or a video, reorder them, remove them, and add alt text to each image for accessibility. Each platform automatically uses what it supports — Google Business shows a single image and no video. Instagram requires at least one image or video.
Generate an image with AI
No photo on hand? Under Media, click Generate image — leave the description blank and we picture your post for you: the image is drawn from what your caption says, not the words themselves. Prefer a specific shot? Describe the scene you want (for example, "a quiet campsite by the lake at sunset") and we use your description exactly. We create an on-brand picture that fits your business and add it straight to your media, where you can give it alt text, reorder it, or remove it like any other image. The picture is even shaped for where it's going — square for Instagram, tall for Pinterest and TikTok, wide for everything else (a multi-channel post gets the wide format, which every platform accepts). Generating an image uses AI credits; if you run out, you'll see a message to upgrade or wait for your monthly reset. (This option appears only when AI image generation is enabled for your account.)
Step 5 — Customize per network (optional)
Don't want to rewrite the caption for every platform yourself? Click Tailor per channel and the AI adapts your shared caption into a version for each selected channel — shorter and punchier where that fits, hashtags where they belong — while keeping your facts, dates, and prices exactly as you wrote them. The versions drop into the per-channel panels below for your review; nothing publishes until you do, and a version you've already customized by hand is never overwritten without asking. Uses 1 AI credit per channel version.
Each selected channel has a Customize for… panel where you can:
- Write a different caption or use different media for that platform.
- Publish that network at a different time. Give any network its own time to stagger the post (for example Facebook at 9 am, Instagram at 6 pm). Networks without their own time go out at the main schedule time; if you leave the main time blank, they go out at the earliest network time. Dragging the post on the calendar moves every time by the same amount.
- Set the format on Facebook/Instagram — Feed post, Reel (vertical video), or Story (disappears after 24 hours). You can also add a first comment that's auto-posted right after your post — great for moving hashtags or a link out of the caption. (First comments don't apply to Stories.)
- On Instagram Reels, tick Trial reel to show it to people who don't follow you first. Choose whether it stays a trial until you share it from Instagram, or graduates to your followers automatically when it performs well.
- On Google Business, pick a post type — Update, Event (with dates), or Offer (with a coupon code and terms) — and add a call-to-action button (Book, Order, Shop, Learn more, Sign up, or Call).
- On TikTok, choose who can view the post and toggle comments/duets/stitches. TikTok also requires you to check a confirmation box that your content follows TikTok's guidelines before it can publish, and every TikTok post needs a video or photos.
- On Pinterest, add a destination link (where the pin clicks through), an optional pin title, and optionally a board ID (otherwise your default board is used). A pin needs one image or video.
- On LinkedIn, optionally add a first comment (great for links) or a company-page URN to post as your page instead of your profile.
- On YouTube, add a video (YouTube is video-only — no photo-only or text-only posts). Your caption becomes the video description; you can also set a title, visibility (Public, Unlisted, or Private), mark it made for kids, and flag it if it contains AI-generated content. A vertical clip 3 minutes or shorter posts as a Short; anything longer or wider posts as a regular video — YouTube chooses automatically.
Writing a blog post? WordPress publishing now has its own home at Website → Blogs — see Your Website for connecting your site and publishing AI-assisted blog posts.
Step 6 — Publish now or schedule
- Leave Schedule for blank to publish immediately.
- Or pick a future date and time — the post publishes automatically then.
- Times use your timezone, shown right under the date picker (e.g. "Times are in America/Chicago"). We detect it automatically from your browser, so what you pick is what publishes — no UTC math.
Click Publish / Schedule to send it. It appears on your Calendar.
See and manage your posts (Calendar tab)
The Calendar tab is where you track and manage everything you've planned and published. Use the Month / Week / List buttons in the top-right to switch views:
- Month — a big-picture grid. Each post shows as a card with its channel icons, time, a photo thumbnail, and the first line or two of the caption. A colored bar on the left tells you the status at a glance (blue = scheduled, green = published, amber = needs review, and so on). Published and past posts are dimmed so upcoming work stands out.
- Week — roomier cards for the week, great for reviewing what's going out in the next few days.
- List — a simple agenda: every post listed by date with its time, channels, full caption, and status. This is your full list of posts — click any row (look for the arrow on the right) to open it.
Use the status and platform dropdowns to filter — for example, show only Needs review drafts, or only your Instagram posts.
Click any post (on any view) to open a details panel on the right. It shows the full caption, every channel it's going to, its photos or video, and the scheduled or published time — plus the right actions for that post:
- Edit — change a post that hasn't gone out yet; the composer reopens with everything filled in (channels, caption, media, per-network options, and the scheduled time). Editing locks in the last few minutes before a scheduled post goes out, and once a post has published you can't edit it — use Duplicate to post a new version instead.
- Reschedule — pick a new date and time.
- Duplicate — create a draft copy to tweak and republish.
- Delete — remove a draft or scheduled post (scheduled posts are also cancelled so they won't publish).
- Retry — re-send a post that failed. If it had actually gone out despite the error (for example, the network timed out after it published), we detect that and sync it instead of posting it a second time.
- Refresh — pull the latest status from each platform for a post you've already sent for publishing.
- Open on… — links to the live post on each platform once it's published.
- Approve, Discard, or Edit — for AI drafts waiting in Needs review (see below).
You can also click an empty day to start a new post for that date, or drag a scheduled post to a new day to reschedule it.
Your "What's happening" board
The What's happening tab is a simple board of what's actually going on at your business right now — offers, events, availability, news, milestones. Add an entry once (type, the detail, and optional start/end dates) and it feeds everything:
- The composer shows a Pull from your board row, so a current offer or event drops into a new post in one tap.
- The Planner builds its drafts around your active entries, so a batch features your real happenings instead of general filler.
- Your website chat can tell visitors about them when asked (for example, "any deals right now?").
Your detail is always featured exactly as written — dates, prices, and terms are never changed or embellished. Use Pause to take an entry out of rotation without deleting it; entries with an end date drop out automatically once it passes.
Plan a batch of posts with AI
Don't want to write posts one at a time? On the Planner tab, the AI Posts Planner drafts a whole batch for you at smart times. If your What's happening board has active entries, each draft is built around one of them — your real offers and events, not generic filler. With an empty board, drafts fall back to seasonal and general updates.
- Pick a horizon — the next 7 or 14 days.
- Set how many posts per week you'd like (1–7).
- Choose the platform the drafts should target (your first connected channel is selected by default).
- Optionally type anything to emphasize (for example, "patio reopening Saturday") and tap the chips below it to feature specific material: your active What's happening entries, or a recent review — a review chip becomes a customer-spotlight draft built around that review.
- Leave Generate an image for each post on (the default) to get a matching AI image with every draft, or switch it off for text-only drafts.
- Check the cost preview — it shows how many drafts you'll get and the AI credits that costs (1 credit per draft, plus 10 per image when images are on).
- Click Generate drafts.
Each draft is written in your brand voice and tailored to your business type and the current season, and is given a suggested best time to post based on your kind of business. New drafts appear in the Needs review list right below the planner — and they're also shown on the calendar in amber.
If images are on, each draft shows "image generating…" for a few moments while we create it, then the picture appears automatically — no need to refresh. If an image can't be made (or you're out of credits), the draft simply stays text-only; you can always add or generate one yourself when you edit it.
If you don't have enough credits for the whole batch, you'll see a message to upgrade or wait for your monthly reset, and nothing is generated or charged.
Review and approve AI drafts
AI-planned drafts never publish on their own — you stay in control. In the Needs review list (on the Planner tab) — or by clicking an amber draft on the calendar — each draft shows its caption, suggested time, and target platform, with these actions:
- Edit — fine-tune the draft before it goes anywhere. It opens as Review draft with a Save draft button; your changes are saved and the draft stays in Needs review until you approve it. Great for adding a photo or tightening the wording.
- Approve — schedules the post for its suggested time and queues it to publish (a future time is held until then; a time that's already passed publishes right away). Once approved, it becomes a normal scheduled post, so you can still Edit it to tweak the caption or add photos/video before it goes out.
- Discard — deletes the draft. It was never sent anywhere, so there's nothing to cancel.
Posts you write yourself in the composer don't go through this review step — they publish or schedule as soon as you submit them.
Repurpose what's already working
Your best content usually already exists — a glowing review, or a post that took off on one platform. Content Studio can turn both into new drafts.
Turn a review into posts
On Manage Reviews, eligible reviews (4–5★ Google reviews) show a Repurpose button. One click drafts a customer spotlight for each of your connected Google Business, Facebook, and Instagram channels — the review's words featured accurately, framed in your brand voice — and schedules the drafts across your best posting times so they don't all land at once. The Instagram draft gets a matching AI image automatically.
Like everything AI-drafted, spotlights land in Needs review — nothing publishes until you approve each one. Costs your normal rates: 1 credit per drafted channel, plus 10 for the Instagram image.
After you repurpose a review, its button becomes a Repurposed ×N counter. Click it to see exactly where that review went — one row per draft with the platform, its current status, the date, and a link to open the draft. Each review can be repurposed once, so you'll never accidentally spam the same quote across your feed.
Repurpose a top post
On Social Analytics (see Social Analytics), the What worked panel lists your top posts by engagement. Click Repurpose on one and the AI adapts it for your other connected channels — same facts, rewritten to fit each platform — and drops the drafts into Needs review. Posts that were already repurposed show a badge and history line so you can tell fresh winners from ones you've reused.
Available on plans that include Social Analytics (Growth and up).
Frequently asked questions
Where did the Posts list go? Your full list of posts now lives on the Calendar tab's List view. Switch to List and click any row to open a post and manage it — edit, reschedule, duplicate, delete, retry, refresh, or open it live on the platform.
Can I edit an AI draft before approving it? Yes. In Needs review (on the Planner tab), or by clicking the amber draft on the calendar, click Edit. The draft opens as Review draft; make your changes and click Save draft — it stays in Needs review until you Approve it.
Do AI-planned posts publish automatically? No. The planner creates drafts that wait in your Needs review list. They only go out after you Approve them. Posts you write yourself in the composer are not affected — they publish or schedule right away.
How are the suggested times chosen? We use proven posting windows for your type of business and platform (for example, a campground's weekend mornings differ from a restaurant's evenings). You can change the time after approving a draft.
Which platforms can I post to? Google Business, Facebook, Instagram, LinkedIn, TikTok, YouTube, and Pinterest — any that you've connected on the Connections page. To publish blog posts to your WordPress site, use Website → Blogs (see Your Website).
How do I post a YouTube Short vs. a regular video? You don't choose — YouTube decides from the video itself. A vertical clip (9:16) that's 3 minutes or shorter becomes a Short; a longer or non-vertical clip becomes a regular video. Just upload the clip you want.
Can I make a text or photo YouTube (Community) post? No. YouTube only lets tools upload videos through its API, so Content Studio publishes a video to your channel — text/image Community posts aren't available.
Why won't my TikTok post send? TikTok requires a video or photos, and you must check the confirmation box in the TikTok options confirming your content follows TikTok's guidelines. Also pick a privacy level your account allows.
Why does Pinterest need a link? Pinterest is a discovery engine — the link is where people go when they tap your pin, so it's how pins drive traffic. A pin also needs one image or video.
I got an email saying a platform was disconnected — what happened? Social platforms sometimes cut the connection on their side — most often after a password change or a security check on your Facebook, Instagram, or Google account. When that happens, we pause posting to that platform (your other platforms keep publishing normally) and email you once. To fix it, open Content → Connections — the affected platform shows an amber Needs reconnecting badge — and click Reconnect, then sign in again. A post that couldn't go anywhere shows as Failed (open it to see Why this failed) — use Retry after reconnecting; a post that still published to your other platforms lists the skipped platform under Platform issues and can be Duplicated to send it to the reconnected one. For the full story (why this happens and how to prevent surprises), see Keeping your social accounts connected.
Can I post the same thing to several platforms at once? Yes. Select multiple channels and publish once. Use the Customize for… panels if you want a different caption or image on a specific platform.
Can I post a Reel or a Story? Yes — open the Customize for… panel for Facebook or Instagram and choose the format. On Instagram you can also make a Reel a trial reel (non-followers see it first).
Can I post to one network now and another later? Yes. Open Customize for… on any network and give it its own time. You can set a main time for the rest or leave it blank — every network then has one explicit time, and the calendar shows the post at the earliest of them.
Can I edit a post after it's published? Editing after publishing isn't available yet. Use Duplicate to start a new draft, or Remove a draft/scheduled post before it publishes.
My Instagram post won't submit — why? Instagram requires media. Add at least one image or video (shared or in the Instagram customize panel).
Can I create an image with AI? Yes — under Media, type a short description and click Generate image. We make an on-brand picture and add it to your post; you can edit its alt text or remove it. It uses AI credits, and the option shows only when AI image generation is enabled for your account.
Why does my AI caption sound different on Instagram than on Google Business? That's intentional. The AI writes for the channel you've selected — Instagram captions lead with a hook and hashtags, Google Business posts read like a local update, LinkedIn stays professional. Select several channels and the caption is written to work everywhere; use the Customize for… panels when you want a channel-specific version.
Will Generate with AI overwrite my edits? No. If you've typed or edited the caption, clicking Generate with AI again asks before replacing it. A brand-new (or untouched) caption is simply filled in.
How does the AI know what to write about my business? It uses your business type, the description and details from your Locations profile and connected website, your FAQs, the recurring themes customers praise in your approved reviews (never quoting a reviewer or using their name), and the style of posts you've published before. The more of those you fill in, the more specific your drafts get — see Brand Voice to shape the tone further.
Will the AI change the details I type? No. The detail you add under "What's this about?" (or on your What's happening board) is featured exactly as written — dates, prices, names, and terms are never altered, and the AI won't invent extras on top of them.
What's the difference between the detail slot and the board? The detail slot is for this one post. The What's happening board is your standing list — add an offer or event once and pull it into any post, let the Planner build batches around it, and let your website chat answer questions about it.